Introduction
Docker is an incredibly powerful tool for building networks of interconnected components without worrying about dependencies, conflicts or machine provisioning. Recently, I needed a quick TeamCity build environment to test some new development changes. Fortunately, JetBrains have now started publishing official images for both the TeamCity Server and Agent components, so today we'll be setting up a simple TeamCity environment using Docker Compose.
Even better, JetBrains offers TeamCity Professional completely free! No reason not to try it out..
The Compose definition
I'll be assuming you're running on a Linux box, but these commands should be pretty easy to co-opt to any other OSes (just update paths as appropriate).
For my setup, I created a simple directory structure under /opt to hold my server and agent data:
/opt/teamcity/
├── agent
├── config
├── data
├── log
└── docker-compose.yml
TeamCity Server
Next, in my new docker-compose.yml file, I start by defining the TeamCity server:
version: '2'

services:
  server:
    image: 'jetbrains/teamcity-server' # the official JetBrains image
    volumes:
      - '/opt/teamcity/data:/data/teamcity_server/datadir'
      - '/opt/teamcity/log:/data/teamcity/logs'
    ports:
      - 8111:8111
    environment:
      - TEAMCITY_SERVER_MEM_OPTS="-Xmx750m"
The volume/directory you map into datadir will be used to hold TeamCity's configuration and project data (likewise for the self-explanatory logs volume).
JVM memory and heap size configuration
You'll see the TEAMCITY_SERVER_MEM_OPTS option above; TeamCity veterans will recognise it as how TeamCity's underlying JVM picks up its memory configuration, but if you're new to TeamCity, or the JVM (like me), it's probably a little confusing.
Essentially (and this is an over-simplification) TeamCity relies on the JVM for controlling it's maximum RAM usage, and the JVM uses the values you specify in the TEAMCITY_SERVER_MEM_OPTS environment variable. Here, I'm telling it that the JVM should max out at 750MB RAM, which is JetBrains's recommendation for minimum/small deployments. Around 4GB and above, it starts becoming necessary to also include a value for -XX:ReservedCodeCacheSize=<value> but smaller deployments don't need this.
For more detail, checkout the documentation on configuring TeamCity memory settings.
Note that some other (usually older) guides recommend also setting
-XX:MaxPermSize: this is no longer needed!
My First Agent
Now, our TeamCity server still needs an agent to do the grunt work of our builds, so let's also add an agent to our Compose services:
version: '2'

services:
  server:
    ... #snipped
  agent:
    image: 'jetbrains/teamcity-minimal-agent' #the official JetBrains image
    environment:
      - SERVER_URL=server:8111
For some reason, the
teamcity-minimal-agentscripts are incredibly picky about format ofSERVER_URL. Be wary!
Again, we provide one environment variable, SERVER_URL, that defines what TeamCity server our agent connects to. Fortunately, Docker Compose automatically links all the services in an application with their service name, so we can simply use server and it will always point to our TeamCity Server container, even when recreated.
You can optionally provide a volume (or host directory) to map to the agent configuration data, but this is not required (maps to /data/teamcity_agent/conf).
Now, run docker-compose up -d to quickly create all our containers.
Setting up
To get TeamCity Server set up, open http://<your-server-ip>:8111 in a browser. Initially, you'll see the "First Start" window, so click Proceed to continue.

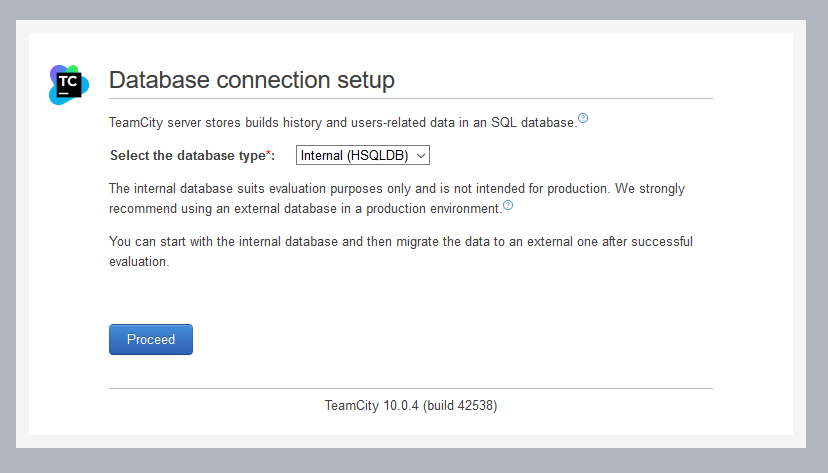
Next, choose a database connection. Since this is a testing setup, I'm using internal, but you can also add a PostgreSQL container to your application and use that.
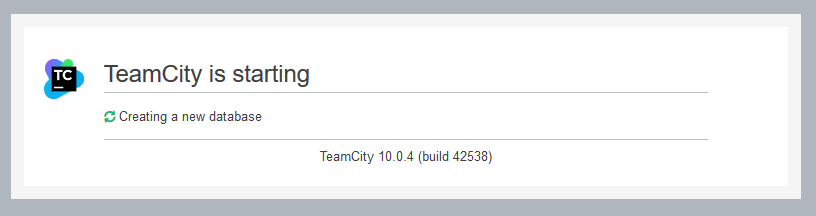
Finally, you'll see the loading screen announcing TeamCity is starting. Accept the License Agreement when this is complete to get started with your new TeamCity server.
Adding our first agent
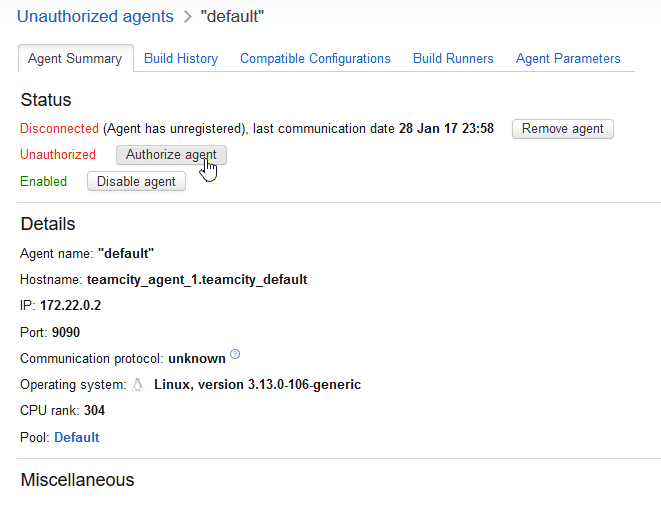
The agent we created before will have attempted to register with our TeamCity Server, which won't know anything about the agent and won't therefore automatically register it. Click the "Agents" section from the top menu bar, then under "Unauthorized" you should now see your new agent container:

Click on the agent to view it's properties, then click on "Authorize" to add it to the server's agent pool.
Adding more agents
Thanks to the awesome power of Docker (and Compose) you can even add more agents to your environment with just one command. Try running:
docker-compose scale agent=2
and watch as a new agent is created, identical to the first, ready to authorize from the UI just as we did earlier.
mgmt@host-server:/opt/teamcity$ dc scale agent=2
Creating and starting teamcity_agent_2 ... done

Summary
You can use this Compose file to quickly and easily stand up a fully scalable TeamCity environment with almost no configuration in minutes. Set up a local environment, take TeamCity for a spin, then scale up and integrate it with a larger Docker environment for production!
As always, leave any feedback in the comments or hit me up on Twitter!